Working with ASP.Net controls to Insert, Update and Delete with SQL Server Database - No Coding
Working with ASP.Net controls to Insert, Update and Delete with SQL Server Database - No Coding
This blog will teach you how to create a simple application using ASP.Net controls and MS SQL database. We are going to do this without any back end C# codeings. :)
Following shows the page that we are going to create. It has function to:
1. Show some data (I use Employee data)
2. Manage those data (Insert, Update, Delete)

Step 1
Go to Visual Studio. Create a "ASP.NET Empty Web Application".

Step 2
Create a new aspx page. I'll create a page called home.aspx.
Step 3
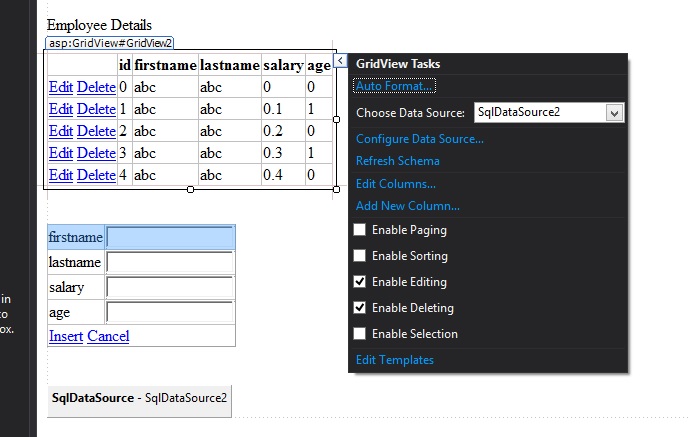
To show, update and delete data we will use - ASP GridView
To insert new data we use - ASP DetailsView
To bind the data to these controls we use - SqlDataSource
Drag and drop following ASP controls from the Visual Studio toolbox to the home.aspx.

Switch to the design mode and drag and drop those controllers as you want.
On the GridView and the DetailsView, set the SqlDataSource using the handlers provide by the controllers.
On the GridView set the DataKeyNames="{your primary key}" (ex: DataKeyNames="id")
Configure the SqlDataSource by using the "Configure Data Source..." link as you want by going through the wizard.
You can also do this within the aspx page.
To perform the Insert, Update and Delete you have to add required command to the SqlDataSource.
On the SqlDataSource section you can have this configurations.

Then on GridView properties change the following values to true:
1. AutoGenerateDeleteButton
2. AutoGenarateEditButton
Then on the DetailsView change the "DefaultMode" to Insert.
Build the project and open the home.aspx on browser.
Then it will look like this.

You are good to go !!


Comments
Post a Comment